

Dressing well is not just about buying clothes, but about looking after them well, and responsibly. Caring for things so that they last longer, and you need less.
In the past we’ve covered quite a few aspects about caring for clothes, including pressing trousers, polishing shoes, darning and washing knitwear.
Over the next few weeks we will be doing some more, focusing on techniques you can use at home. The first is on sewing buttons.
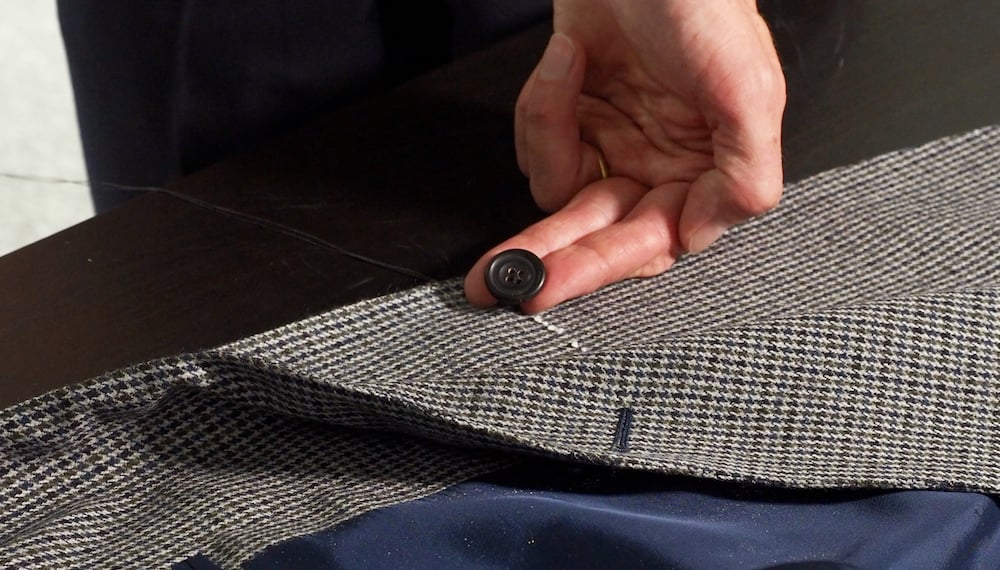
Of course, this being Permanent Style, we have done the most in-depth video on sewing buttons you could ever see. It shows how a Savile Row tailor sews on a button, and covers everything from shank lengths to button stands to thread patterns.
But we also then focus on what you, as a highly engaged menswear consumer, can do at home: which of these tools you need, which steps you really need to replicate. And how to make a quick fix on the go.
Cutter Ben Clarke demonstrates these techniques, in our pop-up space on Savile Row. I hope you enjoy it.
A quick summary of Ben’s points - perhaps for those that have watched the video once, and need a quick reminder - are as follows:
- Most thread is OK, particularly polyester. You just need to sew through more times if using thinner thread.
- Thread your needle, double up the thread, and tie a knot in the end.
- Do your first stitch on the surface of the cloth.
- Then go through the button, come back through, and then push right to the other side of the two layers of cloth.
- Put your fingers under the button to measure how much excess you need to leave on the top, to create the shank. Perhaps around half to three quarters of an inch. It will get smaller as you sew.
- Go up and down through the button and right through the cloth - four times with thicker thread as used by Ben. Perhaps six or eight times with something thinner.
- The last time you come up onto the front of the jacket, don’t go through the button, but wrap the thread round and round, to create a shank. As much as needed to make the button stand on its own.
- Then finish by passing the needle through the shank - but don’t pull the thread all the way through. Leave a loop, which you hook round the needle on the other side, before then pulling the thread tight. This creates a knot.
- Snip off the excess thread, close to the shank.
If you would like to see some other practical videos we have created on Permanent Style, they include:
- How a bespoke suit can be repaired
- How to look after tailoring
- How polish shoes part 1 and part 2
- How to look after suede jackets
- How to look after good shoes
- How to look after and wash knitwear
- How to press trousers
Thank you to Ben Clarke of Atelier Tyzack, and to the Campaign for Wool for all their support through these series of videos.
In the video I am wearing my summer jacket from Solito, and a PS Lighter Everyday Denim shirt.


absolute genius, thank you
Hi Simon. Terrific. It really is the simple things! So easy to follow. May take a bit of practice but this will be forever useful. Love the tip on passing the needle through the shank at the end. Almost looking forward to popping a button.
Awesome! Thanks. Great idea.
I’ve always laid the button flat on the cloth, then overlaid a needle across the top of the button. Then after a free stitches, remove the needle, and you reinforce the shank as in the video.
Same here. If you get yourself a set of knitting needles of several widths, you can use them as spacers that way and easily achieve the desired and consistent shank length.
Clever!
A terrific post.
Is a similar procedure used for sewing on a shirt button for instance?
Where can I buy the professional kit or some of it? I can only think of a couple eg. Berenstain & Banleys or Gutterman thread. There may be others.
Yes it’d pretty similar for a shirt, though we may well cover that separately at some point.
Good point on sourcing the materials used, I hadn’t asked about that. I will now.
I have bought a few shirts (well …16 to be exact) from Edward Sexton in the last 18 months. They have “lily” stitching which I haven’t seen before. They have four hole MOP buttons but the stitching looks like a “Y” bird’s foot (or even a lily !!!) and not an “X” s. It looks both strong and attractive.
Yes, that form of stitching – often called a crow’s foot – is done to show that a button has been sewn on by hand. Because a machine couldn’t sew like that. In fact, I don’t think a machine can sew an X-shape either, though I might be wrong there.
It’s most common on Italian shirts.
If you want 100% cotton, Aurifill has thick ones made in Italy (the lowest the wt number the thicker). A notch above Gutterman in terms of quality. Superior threads is supposed to be good as well. There was an article where they would compare different brands of threads under a microscope.
Many thanks
Lindsay
Hi Lindsay,
On the thread, Ben says:
“Terko 36 Satin Button Thread made by Coats. I got it from Bernstein and Banleys”
Many thanks
Lindsay
Thank you for this video, Simon. It is amazing how these simple things are rarely covered in a comprehensive manner: of course almost everybody knows how to sew a button, but that does not mean that it is obvious how to do so properly.
Would you mind adding shirt care to your practical series? It would be great if you could cover the best ironing techniques, how to remove stains (at least the most common types), and such.
Sure, will do Sebastian
I don’t have time to search for the info you present. If anything, PS is an efficient means of learning and absorbing. No hard sell, no ‘Whassup YouTube’, no ‘How to speak to women’ articles. Like the writing, reasoning and in-depth subjects. Nice.
I’d like to second this thought entirely. Simon has donsistently erudite, well-researched, and informative content. I also always appreciate that Simon takes the time to respond to reader queries about the various things. I’d love to see more how-to videos that are done at the in-depth, intellectual level of PS. Thank you, Simon.
Nice to hear George
Simon…as usual…practical advice for gentlemen who may have a button or two loose …and I do not mean that metaphorically. In the men’s fashion business, PS is a bastion of good advice and sound judgement…thank you…Michael from CT…in the beleaguered USA…Stay well and prosperous.
Hi Simon,
Thanks for the excellent tutorial and helpful advice.
Would you consider making a tutorial about how to finish jacket cuffs by yourself? I imagine a minor percentage of your audience could manage to finish their own sleeves with the proper guidance.
All the best,
Håvard
That might be an advanced level video, but I’ll see. Finishing trouser cuffs is a little easier, and will be next
Hi Simon,
This is a great subject to cover, and I might also add the article on trouser rise as well (it was a revelation to see it discussed in terms of hip bones, and not the navel).
A very mundane question; if you have a button that is starting to come loose, should you try to strengthen up the shank/stitching that is there, or just cut it off and start from scratch?
Hey Ian,
We discuss this towards the end of this video, but it could have been clearer. Ben recommends cutting it off and starting again, unless you are short of time, or are simply after a quick fix before taking it to somewhere more professional.
Thanks Simon; I will watch with more care in future!
It’s a great piece of journalism Simon but don’t be decieved Savile Row tailors don’t sew buttons on – they give that job to their unfortunate apprentice.
This is great. I don’t want to appear to be an ingrate, but can you have him come back one day and show us how to sew on buttons with shanks, like blazer buttons? I have never been able to do it; that is, keeping the emblem right-side-up, making the stitching secure, spacing them properly, etc. I am sure there are tricks to doing it that a well-experienced, professional tailor might demonstrate. Thank you, Simon.
No worries, Jackson, and sure we can try and do that in the future
A very informative and valuable post. The video quality is also top notch.
Hi Simon,
I quite like the cloth of the jacket used. Do you know what cloth it is, by any chance?
No, sorry, but I will ask
Checked, it’s 802740 from Scabal’s Gleneagle book
Thank you.
Simon,
On similar topic – can buttonhole be re-done?
Tailor made 2/3 button inverse with ugly side visible and refuses to re-do saying that pulling threads out will leave edges damaged and new buttonhole will not be possible.
Thanks
It depends how big the buttonhole is currently (how far the stitches run away from the cut) but redoing a buttonhole will usually produce something messier and thicker, yes.
Hello Simon and Ben. Thank you to both. Excepting situations where a customer requests something unusual, how do tailors select what color thread to use when sewing buttons?
An additional question. What size needle does Ben recommend for this task, if the polyester/cotton thread is used?
From Ben: “I use a 06 or 05 sharp. I find anything above or below that is a bit large and unwieldy or too small and ineffective. Added to which if you go too small you might have trouble threading the needle – the button thread is quite thick. However, everyone is different so it’s a bit of trial and error. As long as it does the job it doesn’t really matter. To be honest that applies to most tools.”
From Ben: “It’s usually the colour of the button that dictates the colour of the thread. However, if it’s a metal button which has a shank rather than holes I use the cloth as the guide.”
Thank you, Simon. Please convey my gratitude to Ben as well. It’s time for me to purchase buttons (brown and navy horn), thread (brown and navy), and wax from the Lining Company. Then, it’s time to practice changing the buttons on some old suits. Though not as glamorous as learning to bake sourdough, it’ll be a nice extra skill to gain during Covid!
Absolutely. I hope t goes well Felix
Hi Simon
as always you made the best tutorial and arguably the best video for sewing on button with great expression ; but what I’ve considered is there’s something you and Ben didn’t talk about . when you start to sew on a button , we have four buttonhole and non of them didn’t considered as center So If you start to put the thread through a hole and swing it around you will see the buttonstance starts to change and there’s any center considered to hold the button in the same point you have been specified exactly .
so the question is which hole do you considered as the center ?
should we place the buttonstance point exactly among the four buttonholes ?
thank you again
Best
Ebi
Hi Ebi,
I understand what you mean, but it shouldn’t make any difference. As long as you’re always sewing through the same single point in the cloth, and you’re using all four holes of the button, the button will stay centred over that point on the cloth.
So yes, place the buttonstance among the four buttonholes, and don’t worry how the button sits at the start.
Thanks
Hi Simon. A very interesting article with much useful advice. Given the advice about sewing right through to the other side, should I worry that my English Tweed Overcoat (wonderful coat by the way) has buttons sewn into the cloth rather than through? Do different rules apply when the cloth is very heavy?
Yes, they do vary with the material, and not everyone would agree that it’s necessary to sew all the way through
Simon: would you sew on an overcoat button yourself if it had come loose and it was hard to see the tailor who made the coat originally (e.g. a korean tailor)? Or would you alternativelly bring the coat to a local seamstress/ “alterations tailor”? I am having this dilemma with a bespoke overcoat made in Florence – the buttons are attached behind the lining so I`m not so keen on “piercing the lining” if you know what I mean? And partially removing the lining to properly attached the button “from behind” is a much bigger job that requires a professional skill level in my opinion.
I’d do it myself to be honest, but you don’t need to remove the lining, you can just go through the topside material. A little harder though